
Most Figaro owners are aware that our cars came from the factory with A/C systems designed for and charged with R-12 refrigerant.
R-12 was banned internationally from further manufacture back in the mid ’90’s due to concerns of harm to the ozone. So, experts came up with a less harmful refrigerant named R-134 and that has been the default standard for auto A/C systems ever since. Unfortunately, R-134 is significantly less efficient in its cooling capabilities than R-12. Newer systems specifically designed for R-134 have larger capacity compressors, condensers, and evaporators to compensate for the decrease in efficiency.
Since the advent of R-134, and due to the relative scarcity of R-12 supplies, it has been common practice for mechanics to “convert” older R-12 systems to R-134 usage. The most common method is to merely evacuate the R-12 system of its refrigerant (legally in the US to be performed only by a shop which possesses refrigerant reclamation equipment, to prevent escape into the atmosphere), then screw adapter fittings onto the two service ports to accommodate the R-134 service gauges (which DO have different fittings to avoid confusion), charge the system with R-134, and forget about it.
Such was the case with our own Figaro, which had previously (and understandably) been converted to R-134 when it resided in cooler England, and that configuration likely served drivers there well.
The problem with the Figaro is, that by all accounts, these lovely cars, designed solely for the cooler Japanese climates, not for hot, sultry summers such as we experience in the southern U.S., offered somewhat marginal cooling even with the more efficient R-12. These small systems, when “dumbed down” with R-134 refrigerant, just aren’t adequate for our U.S. summers. Even during cooler spring months here, we could see the handwriting on the wall, as we found ourselves constantly checking to see if the A/C was even engaged, due to the puny level of cool air produced.
I consider myself reasonably informed on auto A/C systems, having installed a number of after market units on our own classic car fleet. My tool and equipment collection includes the requisite items for system installs and charging.. basically, a vacuum pump for evacuating unwanted moisture from an empty system, and a set of A/C “manifold gauges” available at any auto parts store or even on Amazon:
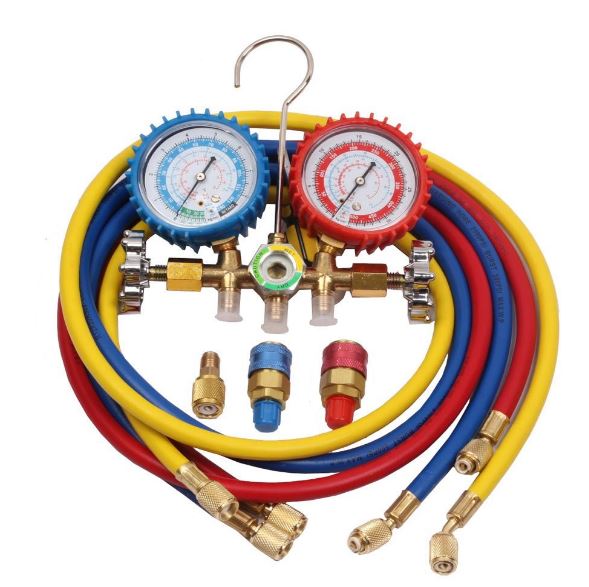
So, my first step was to attach the gauges up to the Figaro and confirm that, yes, the system did appear to be properly fully charged (with R-134) and developing appropriate operating pressures (at Texas summer temperatures: High side pressure of 225-250 PSI, and Low side readings of 25-35 PSI).
After researching on the web of other experiences of converting BACK to the more efficient R-12, I found many owners (not necessarily Figaros) reported significantly colder air temperatures with R-12, so I elected to perform the reverse surgery on our own Figaro.
Some internet observers insisted that the proper way to switch from one refrigerant to another is to:
However, after examining the Figaro’s system, I found that the entire system has non-industry-standard connector fittings (EXCEPT for the standardized service ports), including the connections at the receiver-drier. I was concerned that if I disturbed those fittings during a flush operation, I might damage unobtainable seals or replacement fittings. I also made the assumption that the initial conversion TO R-134 was accomplished merely by evacuating the old R-12 and refilling with R-134, leaving intact the original R-12 compressor oil. Based on those considerations, I opted just to follow the steps outlined below:
When I finished the task, I could NOT believe the difference in cooling capability of this system. For the first time ever, I found myself actually reducing the temperature slider back from full COLD, and moving the fan switch from “3” to “2”. NOW I have a proper Southwestern-capable A/C system!
Notes on this project:
If you DO choose to accomplish this task yourself, you will need the following:
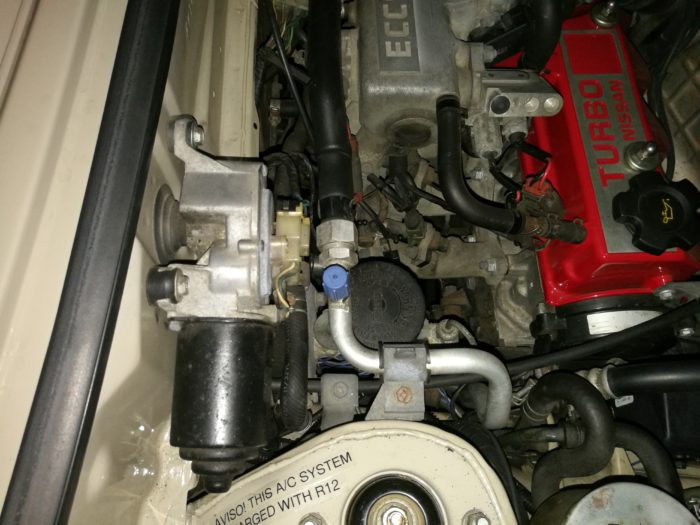
Low Pressure port
4. Attach the RED hose from the manifold set to the RED service port in the engine bay.. driver’s side, near the front grill:
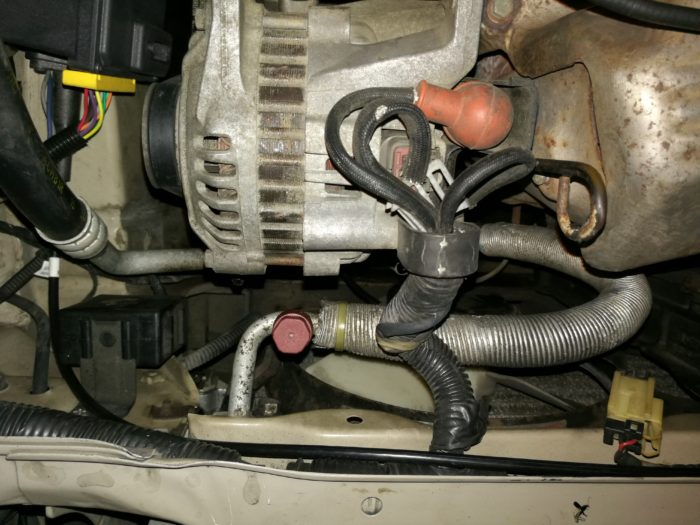
High Pressure Service Port
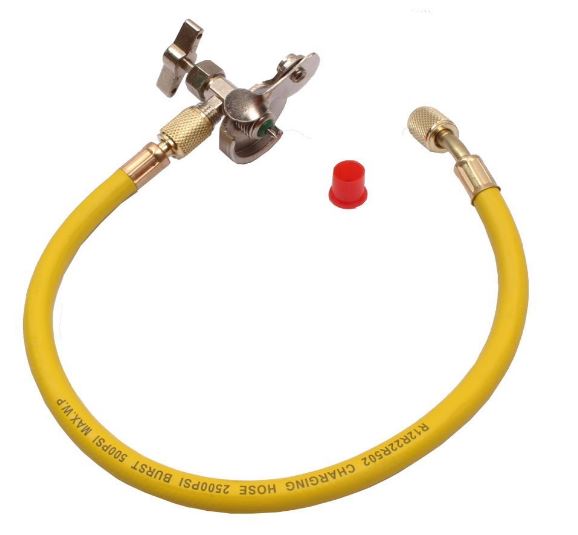
5. With both the BLUE and RED valves on your gauge set temporarily closed.. open the R-12 Can Tap, then loosen the yellow hose fitting slightly at the gauge set to allow any air to be purged from the line. Then tighten all hose fittings and AGAIN WITH ENGINE OFF, open both the BLUE and RED valves on the gauge to begin interjecting R-12 into the system. If refrigerant is flowing, you will feel the supply can get quite cold. If it doesn’t, something isn’t correct. And, be sure to always hold the R-12 can UPRIGHT while transferring refrigerant. Turning it upside down will dump liquid R-12 into the system instead of gas, and it could literally damage the compressor.
We do this first with engine off because we have to create enough pressure in the system to override the built-in low-pressure safety switch.. otherwise, it would not allow the compressor to turn on.
6. Once pressure readings stabilize on both the low pressure (blue) and high pressure (red) gauges, VERY IMPORTANT: CLOSE the RED valve to the High Pressure line. Note that this valve only opens the connection between the yellow refrigerant line and the red hose. You will still be able to read the pressures from the high pressure side, but we want to isolate the R-12 can from the high pressure once the engine is running, otherwise it could literally blow the can up. Repeat after me: NEVER open the RED valve anytime the engine is running with A/C engaged. NEVER!
7. With ONLY the BLUE valve open (and the valve on the R-12 Can tap), start the engine and turn the A/C system on full cold and high fan. It is recommended that you set up an auxiliary floor fan blowing toward the A/C condenser (radiator) at the front of the car to keep temperatures down. It can speed up the process to have a friend hold the RPM’s at about 1500 while charging. The whole process can take a good 10 minutes, and by shaking the can from time to time you will get a sense of how close to empty it is.
You will be primarily watching the pressure reading on the HIGH PRESSURE gauge (Red one), and you will see the pressure slowly increase as R-12 is being drawn into the system via the low pressure (Blue) service port. Depending on your ambient outside temperature, you will be looking for a maximum high-side pressure reading of between 180-225 PSI (higher pressure for higher ambient temperature readings. Based on my experience, you should be able to charge a full can (14 ounces) and keep pressures within that limit. Correspondingly, the low pressure readings at completion should be in the 30-50PSI range. If readings are significantly outside that range, then you may have some internal issues, such as a blocked expansion valve.. etc.
8. Once you have injected the full can and observed appropriate pressures, you are done! Turn off the engine, close the tap on the R-12 Can, remove the Blue and Red hoses from the engine bay, and replace the dust caps on the service ports. Hop in your car and enjoy some COOL AIR!
disclaimer:
The procedures discussed here are offered solely as one amateur owner’s experience. The subject matter presented is to the best of my knowledge correct ONLY regarding the laws of the United States, and likely will vary in our countries.
Any changes made to your system, following any of these steps, is to be done at YOUR OWN RISK. It is your own responsibility to carefully research this process, including any legal aspects for your particular country of residence, to assure that you are fully compliant with all local regulations and restrictions!